Wide uses the full column for everything, text, diagrams, code, and exercises. Narrow keeps the standard reading width.
Text size
Scales the body text. Headings and code blocks keep their size.
In this section
▾
Linux Endpoint Investigation: Course Orientation
Module 0
LINUX ENDPOINT INVESTIGATION · MODULE 00
When a Linux system is breached, respond with a method, not a guess.
Linux runs the servers, the cloud, and the containers, and almost none of the Windows-centric DFIR you may know transfers cleanly to it. This course gives you a proven method to investigate, contain, and eradicate threats on Linux hosts, cloud VMs, and containers, working the evidence the system actually leaves behind. This module shows you what you'll be able to do, the evidence and environments you'll work, and how the course gets you there.
10 modules
across 5 phases
3 environments
server, cloud VM, container
Free toolkit
labs on your own hardware
No prerequisites
every concept built up
Why this course exists
Linux is the infrastructure. It runs the web servers, the databases, the cloud workloads, and the containers that the business depends on, which is exactly why attackers target it. When one of those systems is compromised, the instinct to reach for Windows forensic habits fails fast: there is no registry, the logs live in different places and different formats, persistence hides in cron, systemd, and shell profiles, and on a container the evidence may vanish the moment it restarts. Responders who only know Windows freeze, and the investigation stalls while the attacker keeps moving.
This course removes that gap with a method built for Linux. On Linux, everything is a file, and once you know which files hold the truth and how to read them, a compromised host stops being a mystery. You learn a structured response cycle, acquire the evidence, analyze it, build the timeline, contain and eradicate the threat, and report it, and you apply that same cycle across bare-metal servers, cloud VMs, and containers, against real compromise scenarios rather than toy examples.
What you will be able to do
This course is built around what you can do under a real Linux incident, not the commands you can recite. Every module drops you into evidence and makes you work it to an answer you can defend.
Acquire evidence the right way
Collect from Linux servers, cloud VMs, and containers in order of volatility, capturing what disappears first without trampling the rest.
Read the filesystem and logs
Work the Linux filesystem and the log landscape, syslog, journald, auth, and shell history, to establish what happened and when.
Investigate real compromises
Trace initial access and server compromise, then privilege escalation, persistence, and lateral movement, the way they actually unfold on Linux.
Handle cloud and containers
Investigate compromise in cloud VMs and ephemeral containers, where the evidence rules differ and a restart can erase the scene.
Analyze memory and malware
Capture and analyze Linux memory, and run live response and volatile-data triage on a system you cannot take offline.
Build readiness and reports
Produce investigation reports that hold up, and the readiness materials that make the next Linux incident faster to handle.
You also leave with things you keep: a full Linux forensic toolkit, hands-on labs you run on your own hardware, and a repeatable method you can take into any Linux, cloud, or container incident.
The evidence and environments you will work
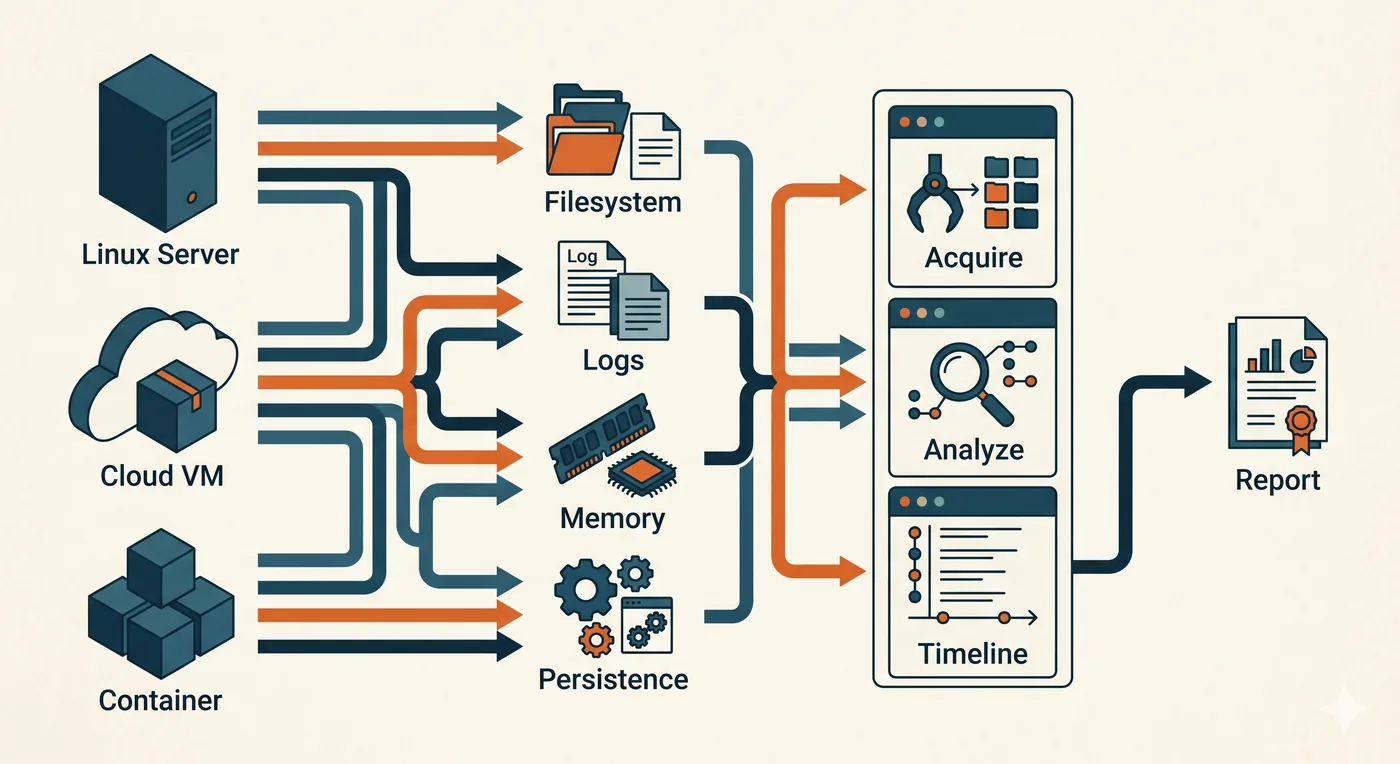
Linux holds its evidence differently, and across three environments that each behave their own way. A bare-metal server, a cloud VM, and a container all record what happened in their filesystem, logs, memory, and persistence mechanisms, but the volatility and the collection method change with each. The method is constant: pull the evidence, acquire and analyze it, build a timeline, and report. This course runs that flow across all three environments.
You work this with a free, professional toolkit, Volatility for memory, Log2Timeline for timelines, and the standard Linux forensic utilities, in hands-on labs you run on your own hardware. There is nothing to license and nothing to rent. The method is what carries: the evidence-up, response-cycle discipline you build here works across distributions, cloud providers, and container runtimes, and the same investigative habit applies to any platform you have to respond on next.
How the course is built
Ten modules move through five phases. You build the Linux forensic foundations, learn to work the core evidence, investigate the major compromise scenarios across server, cloud, and container, go deep on memory and live response, then turn it into readiness and reporting.
What you need and who this is for
There are no prerequisites, and every concept is explained the first time it appears. This course is for anyone who may have to respond on Linux: DFIR analysts extending beyond Windows, incident responders who own cloud and container workloads, security engineers protecting Linux infrastructure, and the sysadmins and SREs who end up holding a compromised box and need a method to work it.
Transferable response method
Acquire, analyze, build the timeline, contain, eradicate, report. The artifacts are Linux; the cycle runs any incident on any distribution, cloud, or container runtime.
Free tools, your own hardware
Every tool is free and the labs run on hardware you already have. Module 0 walks you through building the toolkit and lab, so there is nothing to buy before you start.
How to get the most
Work each scenario against the evidence yourself before reading the answer, and keep the commands and procedures that work. That habit is how your toolkit becomes second nature.
Do I already know this material?
Six quick scenarios across the full range of this course, from live triage of a Linux server to recovering a deleted-but-running binary. Answer them to find out where you sit, and whether this course fits or it will sharpen knowledge you already have.
You are first to a running, possibly compromised Linux server. What should guide your first collection steps?
Power it off immediately and image the disk.
Capture volatile state first, running processes, open network connections, loaded modules, and memory, before any action that loses it, because shutting down or rebooting destroys that evidence.
The most fragile evidence on a live host is its running state. Processes, sockets, loaded modules, and memory disappear at shutdown, so you capture them before disk, which survives a power-off.
Reboot it into a clean state first.
Read only the application logs.
You want to find authentication activity and privilege escalation during the incident window on a Linux host. Where do you look?
The system authentication and session logs, such as the auth log and the journal, plus the login and escalation records, which capture who authenticated and what was elevated.
Linux records logins, failures, and sudo or su escalation in its authentication and session logs. That is where you place who was on the system, when, and when they gained higher privilege.
The kernel source tree.
The desktop environment settings.
The package manager cache only.
You suspect an attacker established persistence on a Linux host. Which set of locations is most important to examine?
Only the user's home directory.
The screensaver configuration.
The common persistence points: cron jobs and timers, systemd service units, shell startup files, and authorized_keys, where attackers most often survive a reboot.
Persistence on Linux clusters in a handful of places that run automatically: scheduled jobs, services, login scripts, and trusted SSH keys. Checking those first finds most footholds that outlast a reboot.
The font cache.
On a compromised Linux host you are tracing how the attacker became root. Which is a classic local privilege-escalation vector to check?
The wallpaper settings.
Misconfigured sudo rules and unexpected SUID binaries, which can let a normal user execute code as root.
Most Linux privilege escalation runs through misused trust: an over-broad sudo rule or a SUID binary that can be coerced into running attacker code as its owner. Those are the first things to enumerate.
The number of open browser tabs.
The hostname.
A suspicious process is running, but the binary it was launched from no longer exists on disk. How do you still recover and analyse it?
Conclude it cannot be analysed.
Reinstall the operating system.
Wait for it to write itself back to disk.
Recover the executable through the kernel's live view of the process, the deleted binary is still mapped for the running process via /proc, and capture its memory.
Deleting a file that is still running only removes the directory entry; the kernel keeps the file open for the live process. You can read it back through that process's /proc entry and capture its memory before it exits.
Working on a live compromised host, what is the key discipline that keeps your evidence sound?
Edit files freely; it is your investigation.
Reboot between each step.
Minimise and record your own footprint: prefer read-only and trusted tooling, capture before you change anything, and document every action, since your activity alters the very state you are collecting.
On a live system the investigator is part of the evidence. Trusted, read-only tools, capturing before changing, and a record of every command keep your footprint small and known, so findings survive scrutiny.
Run the attacker's tools to see what they do.
This course is for you.
You will build Linux investigation from forensic foundations through filesystem and log analysis, server compromise, escalation and persistence, containers and cloud, memory analysis, and live response.
You have the fundamentals. The value here is the harder half.
You know the foundations and where Linux records activity, so the payoff is the back half: server compromise, escalation and lateral movement, container and cloud compromise, memory and malware analysis, and live volatile-data triage.
You handled volatile-first triage, persistence and escalation vectors, recovering a deleted-but-running binary, and live-response discipline, the senior end of the discipline. Take the course to sharpen what you have, close the gaps you did not expect, and turn strong instincts into sound investigations.
You are a student of this course now, so start by deciding what you want from it. Are you here to extend forensic skills onto Linux, to be ready when a cloud or container workload you own is compromised, or to build a real Linux IR capability from the ground up? Name that outcome, then turn it into a study plan: which environments and scenarios matter most to your work, how much time you will give it each week, and what you want to be able to handle by the time you finish.
The rest of Module 0 sets you up to do exactly that. Work through it to see why Linux IR differs, how a Linux compromise unfolds, the evidence landscape and the everything-is-a-file model, where attackers hide, the IR lifecycle, the reference environment, and the toolkit and lab you will use. Then begin Module 1.
Stuck on this lesson?
Your question goes straight to the team and we'll reply by email. Sign in to ask.